Category Archives: DIY

Balloon art: Double Stuffing Balloon tutorial from June Bug Photography

I LOVE making balloon garlands for cake smash sessions, and I have done a few tutorial videos showing how I construct my balloon garlands. As cool as the garland making process is, I think DOUBLE STUFFING is way more fun! I don’t always double stuff my balloons, but I just love the variety in tones double stuffing balloons gives!

What is double stuffing a balloon?

-Double stuffing is exactly as it sounds…you STUFF a balloon into another ballon before blowing your balloon(s) up. The color of balloon on the inside changes the overall color of your blown up balloon. You can make balloons darker, cooler, warmer, and more! I absolutely love a tone-on-tone look in all of my photography, and double stuffing is such a great way to create subtle shifts in color while still keeping the overall vibe monochromatic. I love making gradient balloon garlands!

How to double stuff a balloon:

Double stuffing is super simple. You’ll need a sturdy straw (I use a reusable boba straw), a balloon hand pump (you can use an electric pump, but you typically have to stretch the double stuffed balloon a bunch before the electric pump will be able to inflate, and I just find it faster to hand pump) , and two balloons. I always place the balloon with the color I am wanting to be closet to on the outside, and the “shifter” balloon on the inside. Place the “shifter” balloon on one end of the straw, then stretch the main balloon on top of the shifter balloon. Then you will pull the double stuffed balloon off the straw by the top of the balloon. Then use your hand pump to inflate, and finally, tie off the INSIDE (shifter) balloon.

I love using browns, grey, and black balloons to shift the main color of my balloons. I have found that lighter main colors tend to shift more when double stuffing.

In my examples below, I show double stuffing with the following “shifter” colors. These colors are on the inside of the double stuffed balloon. The colors in the images below are white, tan, brown, gray and black. I also show an example of the main color balloon without anything inside (not double stuffed).  I do some fun double stuffing math, showing how the different shifter colors can make subtle changes to your main/outside balloon. Using double stuffed balloons, you can experiment with color matching, creating gradients of balloons, ore just mixing up fun colors!

Please follow and like us:

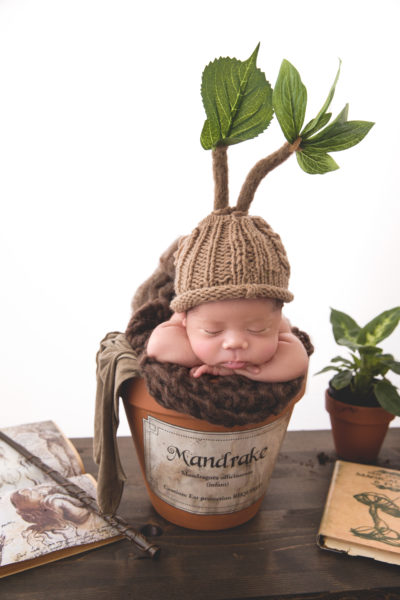
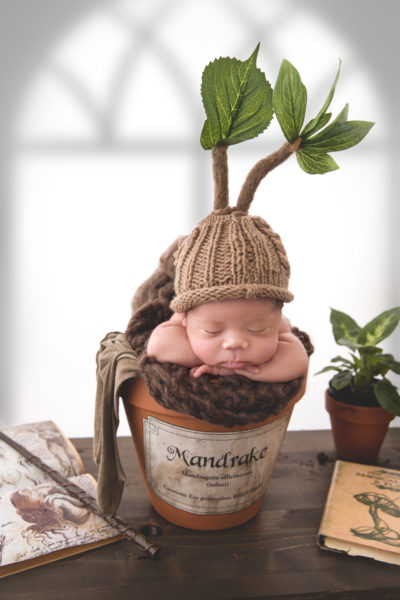
Mandrake Baby, Harry Potter themed Newborn photos. Mill Creek Newborn photographer.

It’s a little embarrassing to admit that I already owned every single item in this set-up of a tiny Mandrake Baby. Any other hard-core Harry Potter fans out there? (Scroll down for a tutorial to make your own Mandrake HAT!!)


Every few months, I’ll get a fun idea in my head..and the only way to get it OUT OF MY HEAD is to actually make it happen. I had an adorable knit hat from Ulaby, and I just loved the way the cable knit looked like braided branches of a tree. I decided to modify my newborn hat and add some stems and leaves. I realize that I am totally not the first person to turn a baby into a Mandrake, nor will I be the last..but I tried to create something different, fun, and beautiful. I tried to imagine what the Hogwarts Greenhouse would look like, between Herbology classes with Professor Sprout.

Here are some sweet sleeping Mandrake Photos

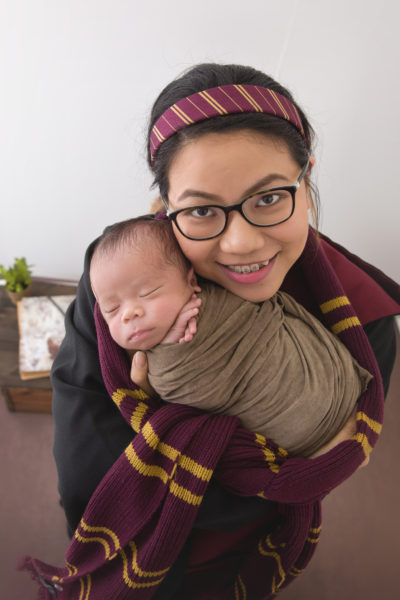
Some Baby Mandrake with his Mama (don’t forget ear protection!)


And some behind the scene images of my Hogwarts Greenhouse set.


To modify my bonnet, I used the following materials:

Needle Felting Needle

Brown Wool Roving (I used about an Oz)

Knit Hat (Mine was handmade from Ulaby, but you can use any brown bonnet/hat that fits baby!)

Needle Felting Foam (THIS kit looks like a great way to get needle, foam, and roving if you don’t already have them!)

Fake Leaves


Please follow and like us:

DIY newborn posing stand, full tutorial Dog bed newborn poser

I’ve become obsessed with this dog bed stand, and have taken it to a new level. Here is my updated tutorial to build your own dog bed newborn poser!

My last post described how I added an adjustable backdrop to the dog bed…but it wasn’t good enough for me. I decided I needed to raiser the posing surface up about 6-8″ so I could easily sit at the poser and comfortable pose baby. My current poser is way to to tall, and I have to do this creepy squat/hunch while posing, which isn’t great for my back (and I’m sure it doesn’t look amazing either). The first dog bed hack I created was good, but a little bit too low. I could BARELY squeeze my legs under while sitting “criss cross applesauce” and I worried that I would have to lean too far forward to pose baby. This new version raises the dog bed up about 6 inches, which is the perfect amount of additional space for me to sit comfortably under the bed while posing. I can also sit up straight (while sitting on my rear) and be right at the posing surface.

The backdrop part is still adjustable (rad!), and it isn’t attached to the dog bed with duct tape (I know, we all loved the duct tape…but this way is super legit!). Basically, I built a frame for the dog bed to sit on, and the backdrop hinge is attached to the frame. The dog bed can be removed if needed (maybe to replace the fabric on the bed, if it gets stretched out?). The casters (wheels) are totally optional, but I think they look pretty slick. I got casters that can lock, so it will stay put when I need it to. I ended up spending about $100 (including shipping) for all components for this thing. If you decide you don’t need casters, you can probably cut that cost in half.

What to call it… dog bed newborn poser with adjustable backdrop just doesn’t sell it…

I am excited to ditch my huge round newborn poser and backdrop frame, and now I need to find something to do with my first dog bed version! Maybe I’ll let the dog have it!

I’m a super visual person, so instead of writing out all the steps, I tried to make some visuals for you.

I bought some of the more obscure fittings online at FORMUFIT (the 2-way adjustable elbows, 1 1/4″ PVC caster fitting inserts, 5 way cross PVC fittings, 3″ no skid swivel casters with brakes, and 3/4″ to 1 1/4″ PVC fitting reducer all came from FORMUFIT the other parts can be easily found at a local hardware store).

You’ll also need the COOLAROO dog bed, which I bought from AMAZON (I used the LARGE size)

Here is a list of the different parts you’ll need. Don’t mind the part where I forgot some parts and had to draw them in photoshop..
2017-09-12_0008.jpg

And a handy cut list. I recommend wearing safety glasses when cutting. Trust me on this one. I used three 10 foot lengths of 3/4″ schedule 40 PVC. You can get away with two 10 foot lenghts, and a 5 foot length…but I didn’t want to risk having to go back to the hardware store if I messed up. (spoiler alert. i messed up. i also had to go back to the hardware store anyway..so, there’s that)

2017-09-12_0007.jpg

I recommend starting with the legs. They’re the trickiest part, so lets get them out of the way! The front legs and back legs are different, because we need an extra attachment point for the backdrop/hinge off the back.

2017-09-12_0010.jpg

2017-09-12_0011.jpg

2017-09-12_0009.jpg

Now, lets put together the adjustable backdrop stand. This will attach in the BACK.
2017-09-12_0005.jpg

The sides are two peice of PVC with a TEE in the middle. This allows the bar across the front to be stepped back a little bit, so you can slide under the dog bed without hitting your knees on the bar.

2017-09-12_0004.jpg

Now, attach the front and back feet to the side sections, and add the 49 1/4″ front and back cross bars

2017-09-12_0003.jpg

Now, pop the backdrop stand you built earlier to the back corners of the frame.

2017-09-12_0006.jpg
2017-09-12_0002.jpg

Aaaaaannnnd, pop the dog bed into the four corners (the tops of the legs)

2017-09-12_0012.jpg

2017-09-12_0001.jpg

Ok, so now that you know it all fits together, and you’re an expert at building this thing..you get to take it apart and use PVC cement on all joints. I put a bit of cement on each junction where a PVC pipe attached to a fitting. This will make your set up super secure.


I’ll post my in use, some behind the scenes, and an updated review of the new poser and backdrop stand! I have a newborn on Thursday, and I’m super excited to use this new set up.

My studio is in Mill Creek WA, and I’d love to help anyone local out with building one of your own! I’m pretty close to Seattle, Everett, Edmonds, Snohomish, Bothell, etc so hit me up if you want to check it out!

Please follow and like us:

DIY Newborn Poser and Backdrop Stand, Mill Creek newborn photographer June bug PHotography

About a year ago, my friend Mary Kriss of Mary Kriss Photography shared that she had started using a dog bed for posing. I thought she was a genius, but had a posing beanbag that worked for my space so I didn’t jump on board.

I currently have a round beanbag, with a steel frame surrounding it. I really do love it, my dad built it for me and I have used it for about a year. What I have realized though, is that I HATE having my beanbag out in the studio ALL. THE. TIME. My current poser doesn’t fit in my closet, and has to stay out in my shooting space. I don’t like that. At all. I have also realized that the slope of the backdrop starts too far toward the front of the beanbag and tends to block some of the light from baby. So. Back to Mary’s idea. Dog bed to the rescue!

So, the dog bed is a pretty great solution. It’s cheap (about $30 on amazon). Lightweight, and doesn’t take up much space (aka: it fits in my prop closet). I also love the the backdrop fabric can be clamped at any edge of the dog bed to make a super seamless, smooth backdrop. BUT! I needed a raised backdrop. The dog bed is perfect for overhead shots (like the tucked in pose, or dream wrap) but I wanted to be able to clip my backdrop up for other typical bean bag shots like froggy, potato sack, bum up, etc. So…I hacked together a quick backdrop support that can move along with my dog bed. I use natural light, and I am constantly adjusting my beanbag into the light depending on my pose. Because I can’t just move my light, I have to be able to easily move the entire setup, including the backdrop…which means I can’t just have a bar attached to the wall to clip my backdrop to…or use backdrop stands, as that would be super annoying to try to all move together.

To build your own you will need:
10 foot length of 3/4″ PVC
Two 3/4″ PVC elbows
PVC cement
Adjustable PVC joint (comes in a pack of two)
Zip Ties
Elevated pet Bed

You will also want a drill, and a way to cut your PVC. You can have them cut your PVC to size at the hardware store, bring your cut list with you to the store!

2017-09-05_0001.jpg

I love the push button adjustable joint! I can easily adjust the angle of my backdrop, and it locks safely in place. I am super excited that I can fold the backdrop stand all the way agains the dog bed when I’m done. This entire set up is so light weight and super slick.

2017-09-05_0005.jpg

2017-09-05_0002.jpg
2017-09-05_0003.jpg
2017-09-05_0009.jpg
2017-09-05_0008.jpg

Use the diagram above to assemble all the PVC pieces. It should be the same length as the LONG edge of your dog bed. I used ZIP TIES to attach each end of the PVC backdrop stand to the dog bed. I then DRILLED through each leg at the top and bottom and tightened a zip tie through each hole. This keeps the legs nice and sturdy and keeps them from shifting. Bolts would have worked even better to secure the PVC to the dog bed leg…but I didn’t have any long enough, and didn’t want to go back to the hardware store… I then covered the legs with black duct tape to cover the zip ties, so they wouldn’t snag on my backdrop fabrics.

Once I had it all assembled, and made sure it all worked, I took it all apart (except the 8″ PVC sections attached to the dog bed). Use the PVC cement at each joint and reassemble, making sure to work in a well ventilated area. I placed the “BUTTONS” of the joints facing IN, so I could easily use my thumb to adjust the backdrop. Figure out what works best for you and your arm length…


Check out how awesome and easy this poser is to adjust on https://youtu.be/GNjJY6LDWyI


Please follow and like us:

DIY Moss Chair, woodland inspired photography prop tutorial.

Sometimes I get hairbrained ideas. Then I make messes. Sometimes, my ideas work. Usually they don’t. Meet my moss chair.

This one worked. And I love it. I plan to head out this week to photograph my own kiddos on the chair..in the woods. If we’re being totally honest, I plan to dress my 6 year old son up as Puck (Midsummer Nights Dream)…told you I had weird ideas.

Anyway, I’ll show you how I made mine, just in case you want to make a moss chair of your own! I did use these for my spring mini sessions this year..and the moss was MESSY in studio. I had a vaccum handy, and it all worked out..but, fair warning.

Materials:
Chair. Don’t worry about the color/condition of the fabric. Find a chair with a SHAPE you like, and legs you like (unless you want to cover those too). I found mine on craigslist for $10 because a cat had scratched up the fabric.

Moss. I bought preserved moss from amazon (I used one of these boxes and filled in any space with moss I collected myself). MOSS

Adhesive/Glue. I used locktite construction adhesive. You chould use LOTS of hot glue, or another brand. (here’s a link to the brand I used…but I bought mine for much cheaper at a hardware store ADHESIVE

Paint/Fabric Medium. If your chair is red (like mine), you might want to paint it green first. I didn’t want red peeking through the moss. I mixed come cheap green acrylic paint with some fabric medium. Worked like a charm.

All said and done, I spent about $90 (and 2 hours of my life) to make this little guy.

2017-04-17_0010.jpg
To start, I pulled off the seat cushion, painted the entire chair (and cushion) with green paint mixed with a fabric medium. I didn’t want the chair to be too stiff…although I don’t know if it would have mattered after layering on so much glue and moss.

2017-04-17_0011.jpg
2017-04-17_0012.jpg
After the paint had dried, I used a caulking gun to apply/smear adhesive on the chair. I worked in small sections and layed out chunks of moss that I planned on sticking to the char. This was fun, and didn’t take as long as you might think. The moss can be easily torn and or smooshed to fit into the spaces you need. I pushed the moss into the adhesive, and moved to the next area.

2017-04-17_0014.jpg
2017-04-17_0013.jpg
2017-04-17_0015.jpg
2017-04-17_0016.jpg

I worked around the chair, in small sections until the chair was covered. I left the space where the cushion goes empty, and covered only the TOP and front of the cushion. I could have just tossed the cushion and covered the entire chair…but I wanted the height of the cushion.

Any small gaps, holes, etc. I filled in with small bits of moss. I ended up going outside a collecting a bit more moss to add some variety to the color of the chair. I didn’t preserve the moss I found…so it may end up turning brown..but for now it looks great.

I’ll post photos of my chair in the woods if the rain ever stops, and I get a chance to photograph my kiddos this week!

2017-04-17_0017.jpg

Please follow and like us:

Free Snow Overlay! Tutorial for making your own REAL snow overlay and free download of snow overlays. Mill Creek newborn photographer.

Hi guys! Want a free snow overlay?

It snowed!! I got a little overexcited and spent all day taking pictures of the snow and creating my own overlay. You are welcome to download these and use them! I’d love to see what you come up with.

Below is a tutorial for using my snow overlays on your own photos, as well as a video tutorial for how to make a snow overlay of your very own!

show overlay by june bug photography junebugphotography.orgjune bug photography snow overlay tutorial

Video tutorial: How to use a snow overlay (You can download my snow overlays here)


CLICK HERE TO DOWNLOAD SNOW OVERLAYS

snow overlay real snow

Want to make your own snow overlays? Here is a step by step tutorial for that too!

Please follow and like us:

DIY Newborn Romper Tutorial, with pattern.

Dorothy Newborn Romper Tutorial

dorothy newborn costume DIY Wizard of oz newborn costume

I teamed up with Hannah of Buttercup Baby Props for an awesomely themed newborn photo shoot. Hannah is a pretty big deal in the newborn photography world, she makes the most amazing wool layers, bonnets, and props. She’s also super creative, and awesome. I am so proud to call her a friend!


While Hannah needle felted up a tin man bonnet, a scarecrow bonnet, a tin man bonnet, and other props for our themed session, I crafted a gingham romper, fitting for a newborn Dorothy!


The romper was simply adorable, and fit our 5 day-old little model perfectly! I added ruffles to the bum, but that is totally optional! You can obviously choose ANY print/pattern for your romper, and add flair to suit your style.


Fair warning, I am a self-taught sewer…which probably means I do everything “wrong”. Feel free to adapt this pattern, but I will say that it worked GREAT, and fit super well!


Here is the pattern. When you print, make sure not to resize (choose 100% scaling..not fit to page or something else that may resize it).


newborn romper pattern and tutorial Materials:

14” of fabric of your choice

Thin elastic, approximately a yard.

Thread

Sewing machine

Patternnewborn romper tutorialnewborn romper tutorial


Coordinating ribbon/yard for the ties. About a yard needed.


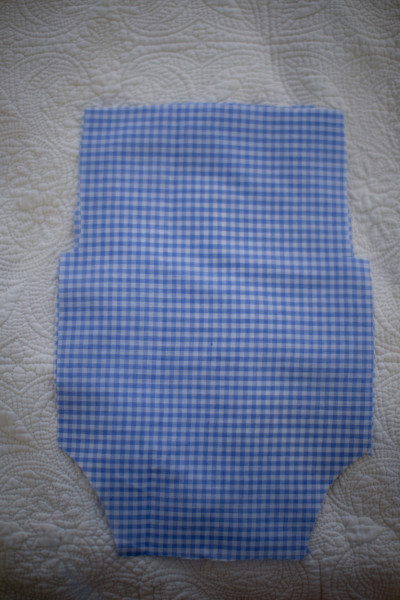
Start by cutting out the pattern pieces, and then connecting the two FRONT pieces. Line up the A triangles, and tape.

Lay patterns on a fold (where indicated) and line up the “FOLD” edge on the fold. Cut out patterns. Cut two of the FRONT piece.

The pattern is made with a 1/8” seam allowance.


Sandwich your ribbon between the two “Front” cut pieces. Place fabric like sides together. Lay the ribbon ends about ½ in from each top corner. Pin the excess ribbon to the center so you don’t accidentally sew over it!

free newborn romper pattern

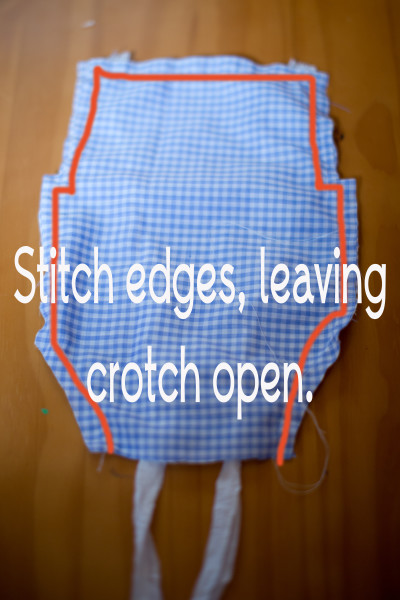
Sew around the edges, leaving the bottom (crotch) open.

free newborn romper pattern newborn romper tutorial

Trim bulk, trim corners, etc. Turn right side out, and press. Use something pointy (pen, etc) to turn out the corners completely. Top stitch the front piece after pressing.

free newborn romper pattern

For the ruffles, I cut a rectangle that was 2” by 22” and one that was 2” by 14”. I totally winged it for this. I then zig-zag stitched one edge (so it won’t unravel), and used a gathering stich along the other long edge. I ruched the rectangles to a size that looked cute on the bum, and used a zig-zag stitch to attach them along the back piece.

newborn romper pattern

baby romper tutorial and pattern

newborn romper tutorial and patternFold over the top edge of the“BACK” piece, sew along the edge creating a pocket for elastic.

newborn romper pattern

I tie my elastic to a bobby pin, and use the bobby pin to pull the elastic through the pocket. Stitch the elastic on one end, and snug the elastic up (so there is about 5 inches extra, and stitch it on the other end. This traps the elastic in the seam, and ruches the back.

free romper pattern

newborn romper tutorial and patternIMG_9091IMG_9090 Next, I line up the sides of the “Back” piece and the “Front” piece, and stich along each side. Because the back has elastic, it will not be as wide, and will not lay flat, but just line up one side at a time. Make sure the lay FRONT and BACK with right sides facing.

IMG_9093

After the side seams are sewn up, line up the crotch of the FRONT and BACK pieces. The back piece will be wider, not to worry. This is because you will be creating a pocket for the elastic in the legs, however the pocket will only be on the back piece. I like to do it this way so the romper lays nice and flat in front.IMG_9094


This last part is a little tricky, and there are TONS of ways to finish a leg hole, but this is what I did. I turned over about ¾” of the leg hole of the back piece, and sewed, creating a pocket for the elastic. I left each end open where it met the front of the leg. Next, use a bobby pin to thread elastic into the leg hole pocket. Secure one end of elastic with a few stitches. Then snug the elastic up, so the leg hole is gathered. The size of you leg hole is up to you, but I made mine a bit roomy to accommodate different sizes of baby. If you are making a romper for a chunky monkey, you will obviously want it a bit loose, and snug it up more for a lean baby. Once you have snugged up the elastic, stich the open end to trap the elastic. Repeat for the other leg hole.IMG_9095

IMG_9097

Turn right side out, trim any loose threads, and admire your adorable romper!!


Hannah is running a giveaway on her blog for the WHOLE SET USED FOR OUR WIZARD OF OZ NEWBORN SESSION! Comes with the Dorothy gingham newborn romper, felted tin man hat, felted lion bonnet, felted scarecrow hat, tiny red wool shoes, a felted red heart, and a itty bitty felted TOTO, all in an adorable picnic basket. This is a one of a kind set, and the prize is valued over $250. Head over to Buttercup Baby Props to enter!!

Please follow and like us:

DIY props – June Bug Photography Snohomish Newborn Photographer

I am a bit of a prop junkie, but I am also super crafty. Any chance I can DIY props, I do! I am feeling pretty proud of this one! While I was at goodwill last week, I found a gorgeous cream colored, cable knit sweater…for $2. I have been pretty obsessed with using neutral props, wraps, backdrops recently, and I wanted to have a great neutral option for my baskets/buckets/etc. When I saw this sweater, I knew I had to do something with it.

So, I bought it. Took it home..and then made a plan! Here is what I came up with, and I feel like a GENIUS! It’s a basket sweater!!

DIY photography props newborn It was crazy easy to make, I just cut from armpit to armpit, so I had a ring of sweater. I then folded over each end about and inch, and used a zigzag stitch to make a pocket for the ribbon (leaving about 1/2 unsewn to get the ribbon in, and for the ends to hang out).

I have a TON of baskets and buckets that this fits over. I just tighten up and tie both ends snug…and I have a gorgeous, neutral cover. I just love the texture, and the sweater at the top of my containers gives a nice, soft surface for baby!

I can’t wait to put my new invention to work! 
June Bug Photography DIY photography props, newborn propsDIY Photography props, newbornNewborn photography props DIY newborn photography props Newborn photo props diyNewborn photography props june bug photographyIMG_7483 snohomish county newborn photographyIMG_7484

Please follow and like us:

Potty Training Craft Project, June Bug photography Snohomish county Newborn and family photography.

If you’ve been to my studio, you have seen the terrifying “Joker” in our guest bathroom. I have had so many parents ask about it, and love the story that I thought I’d share!

Target practice, potty training. June bug photography. Snohomish county photographer.


My son, who is 3 1/2 years old has been “potty trained” for over a year. Translation: he makes it into the bathroom, and points his stream in the general direction of the toilet bowl. My first born was a girl, and I have a very tidy husband…so I was completely unprepared for the LAKES OF PEE on my bathroom floor when Rex started using the toilet on his own. I was seriously cleaning piss from places and trying to work out the physics required to get it there. The ceiling. Check. The walls. Check. HIS FACE. CHECK!! No joke. Insanity.

We spent a year trying things like cheerios in the toilet (fail! he just

got really excited about “chasing” the moving target and ended up making more of a mess…also, he ate them. GROSS.), sitting while peeing (another fail. he manages to pee under the lid, and onto the floor). I sort of just resolved to cleaning up the floor EVERY TIME HE PEED. He felt bad, I was grumpy, not good for anyone.

About 6 months ago, I was sitting with Rex in our craft room, and we were both working on independent art projects. I was working on a vinyl decal, and had an idea. I called him over and asked him “If you could pee on anything, what would it be?”. His response? “Joker. On fire!”. And so, with that, we cut out fire and joker out of vinyl and stuck him on the toilet. I didn’t actually think it would make a big difference, but it was fun anyway.

You guys. It solved all of our pee troubles. Immediately! I didn’t even have to tell him what to do. We put ONE decal on ONE toilet (we have three in the house) and he has not peed on the wall/floor/door/face since. Seriously. Not once. It got him to slow down, practice targeting the pee where it should go…and he is TRAINED! We still have Joker on the toilet, and joke about “pee smacking” him, and he has only lost one eyebrow in the 6 months he has spent in my toilet. He has lasted through numerous toilet cleanings (this toilet gets cleaned ALL THE TIME because it is our guest toilet, and I don’t want our guests knowing how repulsive we are.)

I have no idea if it will work for you, but it is totally worth trying. Its funny, fun, and gets everyone to smile. How could you go wrong? For this tutorial, Rex decided we should make a UNICORN pee target fo

r his bathroom. That’s right. His second favorite thing to pee on, UNICORNS.

Materials, vinyl pee target. June bug photography.

Materials:

Vinyl (I used  631) You can get samples from most places that sell vinyl (on etsy, for example).

Scissors

Sharpie (for drawing details).


Steps:

Choose a design (or copy mine).  A few easy ideas: Flame, fly, X, a dot.

Pee target, vinyl template. Unicorn. June Bug photography. Snohomish county photography.

Cut out your pieces.

Layer pieces, starting with the color/shape on the bottom and sticking the next layer on top.


Pee target, June Bug family photographyPee target, snohomish family photography june bug photographyUnicorn pee targetUnicorn pee targetUnicorn pee target by June Bug photography snohomish county photography

Clean your toilet. (I know, sorry…but just think of all the time you will save cleaning pee off the floor!!)

Clean toilet,

Turn off the water on the toilet (its that knob behind the toilet)

Toilet bowl water shut off

Flush toilet. If all the water does not drain from the toilet when you flush it, fill a bucket with water and quickly dump it in. The toilet will drain. Seems magic, I know. Here is a video, if you don’t believe me: https://www.youtube.com/watch?v=ihpVJMbpLXU

Dry the spot where your decal will go with a paper towel. Make sure it is super dry.

Stick on your decal. Press to secure.

Unicorn target practice. Potty training. June bug photography. Snohomish county photographer.IMG_3047Unicorn Pee target, by June Bug photography. Snohomish county newborn photographer.

IMG_3063


Turn water back on.  IMG_3056 IMG_3054Unicorn Pee target, by June Bug photography. Snohomish county family photography.


Target Practice, Peeing on a Unicorn. Potty Training helper! DIY

You MUST tell me if this works for you! I am crossing my fingers that it does. Might even work for husbands, although I can’t guarantee.  Send me photos, I’d love to see them!!


Please follow and like us:

June Bug Photography specializes in Newborn, Baby, and family photography. Melissa Jenkins (the one behind the camera) is passionate about capturing the fleeting moments of childhood, and is drawn to simple, pure, imagery. 

June Bug Photography is located in the heart of Mill Creek, Washington. Our studio is simply stunning, and we have props, wraps, outfits, headbands, and more for a custom styled session. Melissa is obsessed with soft textures, neutral tones, and simple imagery...and we have everything in studio to help create an unforgettable photo experience.

Menu